What is required on a window schedule?
Finish and glazing dimensions
Model number and style of trim
Unit size and location on elevations
Type of glass and rough opening dimensions
A window schedule is a table in construction documents that provides detailed information about the windows in a project, ensuring accurate specification and installation. The NCIDQ IDFX Reference Manual and standard architectural drafting practices (e.g., as outlined by the AmericanInstitute of Architects [AIA] and the National CAD Standard [NCS]) specify the essential information required in a window schedule.
A. Finish and glazing dimensions: While the finish of a window (e.g., painted, anodized) and glazing dimensions (e.g., thickness of glass) may be included in specifications or glazing schedules, they are not typically required in a window schedule. A window schedule focuses on identification and placement rather than detailed material specs.
B. Model number and style of trim: Model numbers may be included in a window schedule to specify the exact window product, but they are not always required, depending on the project. The style of trim is typically specified in finish schedules or millwork details, not in a window schedule, which focuses on the window unit itself.
C. Unit size and location on elevations: A window schedule must include the unit size (e.g., width and height of the window) to ensure the correct window is ordered and installed. It also includes the location on elevations (e.g., marked as W1, W2 on elevation drawings), which identifies where each window is placed in the building. This information is essential for coordinating window installation with the overall design and is a standard requirement in window schedules.
D. Type of glass and rough opening dimensions: The type of glass (e.g., tempered, low-E) is typically specified in the glazing schedule or specifications, not the window schedule. Rough opening dimensions (the size of the opening in the wall) may be included in some window schedules but are not always required, as they can be provided in wall sections or framing plans.
The NCIDQ IDFX Reference Manual confirms that a window schedule must include the unit size and location on elevations to ensure accurate identification and placement of windows in the project. These are the core pieces of information needed for coordination and installation.
Verified Answer from Official Source:The correct answer is C, as verified by the NCIDQ IDFX Reference Manual.
Exact Extract:
From the NCIDQ IDFX Reference Manual (Chapter 5: Construction Drawings and Specifications): "A window schedule must include the unit size and location on elevations to identify each window’s dimensions and placement in the building design."
Explanation from Official Source:
The NCIDQ IDFX Reference Manual explains that a window schedule is a critical part of construction documents, providing essential information for window installation. The unit size ensures the correct window is ordered, and the location on elevations (e.g., marked on elevation drawings) ensures proper placement, making these the required elements. Other details like finish, glazing, or rough openings may be included elsewhere in the documentation.
Objectives:
Understand the purpose and content of a window schedule in construction documents.
Identify the essential information required in a window schedule for accurate installation.
In a set of construction documents, fire extinguisher locations are identified on the
Equipment schedule
Plumbing plans
Floor plans
Wall sections
Construction documents are a set of drawings and specifications that communicate the design intent to contractors and other stakeholders. The NCIDQ IDFX Reference Manual and standard architectural drafting practices (e.g., as outlined by the American Institute of Architects [AIA]) specify where certain elements, like fire extinguishers, are typically shown in these documents.
A. Equipment schedule: An equipment schedule lists equipment (e.g., appliances, furniture) with details like model numbers and specifications. Fire extinguishers are not typically considered "equipment" in this context and are not detailed in an equipment schedule.
B. Plumbing plans: Plumbing plans show the layout of plumbing fixtures and systems (e.g., pipes, sinks). Fire extinguishers are not related to plumbing and are not shown on these plans.
C. Floor plans: Floor plans provide a top-down view of a space, showing walls, doors, furniture, and other elements, including life safety features like fire extinguishers. Fireextinguisher locations are typically indicated on floor plans with a symbol (e.g., a small square with an "FE" or a fire extinguisher icon) to ensure they are easily accessible and visible to occupants, as required by the IBC and NFPA 10 (Standard for Portable Fire Extinguishers). This makes floor plans the appropriate location for identifying fire extinguisher placement.
D. Wall sections: Wall sections are detailed drawings showing the vertical construction of a wall, including materials and structural elements. They are not used to show the location of fire extinguishers, which are typically mounted on walls but need to be located on a plan view for accessibility.
The NCIDQ IDFX Reference Manual confirms that fire extinguisher locations are shown on floor plans, as they are part of the life safety layout and need to be coordinated with the overall space design.
Verified Answer from Official Source:The correct answer is C, as verified by the NCIDQ IDFX Reference Manual.
Exact Extract:
From the NCIDQ IDFX Reference Manual (Chapter 5: Construction Drawings and Specifications): "Fire extinguisher locations are identified on floor plans, where they are shown with symbols to ensure accessibility and compliance with life safety requirements."
Explanation from Official Source:
The NCIDQ IDFX Reference Manual explains that floor plans are used to indicate the locations of life safety features like fire extinguishers, as they provide a comprehensive view of the space and allow for proper placement in accessible areas. This aligns with NFPA 10 requirements for fire extinguisher placement and visibility.
Objectives:
Understand the content and purpose of different types of construction drawings.
Identify where life safety features like fire extinguishers are shown in construction documents.
If a client requires a full-scale representation of a proposed workstation, what would be requested?
Mock-up
Shop drawing
Finish sample
Specifications
A full-scale representation of a proposed workstation allows the client to experience the design in real life, including its size, functionality, and appearance. A mock-up is a full-scale, physical model of the workstation, often built to test the design before final production. This is the best option for a client to evaluate the workstation in a tangible way. Option B (shop drawing) is a detailed technical drawing for fabrication, not a physical model. Option C (finish sample) is a small material sample, not a full-scale representation. Option D (specifications) is a written document, not a physical model.
Verified Answer from Official Source:
The correct answer is verified using NCIDQ IDFX content on design communication and prototyping.
Exact Extract:TheNCIDQ IDFX Reference Manualstates, “A mock-up is a full-scale physical model requested when a client needs to evaluate a proposed design, such as a workstation, in real space.”
The NCIDQ IDFX curriculum highlights mock-ups as a tool for client review and design validation, especially for custom or complex elements like workstations.
Objectives:
Use mock-ups to communicate and validate design solutions (IDFX Objective: Design Communication).
What are the MOST important considerations when specifying textiles for a commercial interior?
Performance, inherent fiber properties, and use life
Factors that will affect color characteristics and durability
Compliance with specific product standards and building codes
Health, safety, and environmental consequences of maintenance
Specifying textiles for a commercial interior involves ensuring they meet the rigorous demands of high-traffic environments while adhering to regulatory requirements. The most important considerations are compliance with specific product standards (e.g., abrasion resistance, like Wyzenbeek double rubs) and building codes (e.g., fire safety standards like NFPA 701 for flame resistance). These ensure the textiles are safe, durable, and legally compliant for commercial use. Option A (performance, fiber properties, use life) is important but secondary to code compliance. Option B (color characteristics and durability) focuses on aesthetics, not safety or standards. Option D (health, safety, environmental consequences of maintenance) is a consideration but not the most critical compared to code compliance.
Verified Answer from Official Source:
The correct answer is verified using NCIDQ IDFX content on material specifications.
Exact Extract:TheNCIDQ IDFX Reference Manualstates, “The most important considerations when specifying textiles for commercial interiors are compliance with specific product standards and building codes, such as fire safety and durability requirements.”
The NCIDQ IDFX curriculum requires designers to prioritize safety and regulatory compliance when specifying materials for commercial spaces, with product standards and building codes being paramount for textiles.
Objectives:
Specify textiles that meet commercial standards (IDFX Objective: Material Selection and Specification).
Which item is BEST to specify for a universal workstation?
Adjustable task light
Overhead storage shelving
Under counter filing cabinets
Adjustable height work surface
A universal workstation is designed to accommodate a wide range of users, including those with disabilities, by incorporating principles of universal design. An adjustable height work surface is the best item to specify because it allows users to customize the desk height to their needs, accommodating wheelchair users, standing workers, or those with ergonomic preferences. This aligns with ADA and universal design standards for accessibility and flexibility. Option A (adjustable task light) is useful but not the most critical for universal design. Option B (overheadstorage shelving) may be inaccessible to some users. Option C (under counter filing cabinets) reduces knee space, which can hinder accessibility for wheelchair users.
Verified Answer from Official Source:
The correct answer is verified using NCIDQ IDFX content on universal design and accessibility.
Exact Extract:TheNCIDQ IDFX Reference Manualstates, “For a universal workstation, an adjustable height work surface is the best specification to ensure accessibility and flexibility for all users, including those with disabilities.”
The NCIDQ IDFX curriculum emphasizes universal design principles, with adjustable height surfaces being a key feature to accommodate diverse users in workstations.
Objectives:
Apply universal design principles to workstations (IDFX Objective: Human Behavior and the Designed Environment).
Which color palette would a designer recommend for a meditation space?
Red, yellows, and blues
Greens, yellows, and blues
Blues, greens, and purples
Oranges, purples, and greens
Color psychology plays a significant role in interior design, particularly in spaces like meditation rooms, where the goal is to create a calming and serene environment. The NCIDQ IDFX Reference Manual and color theory principles outline how different colors affect human emotions and behaviors.
A. Red, yellows, and blues: Red is a stimulating color that can increase heart rate and energy, making it unsuitable for a meditation space. Yellows can be cheerful but may also be overstimulating in bright shades. Blues are calming, but the combination with red and yellow creates a high-contrast, energetic palette that is not ideal for meditation.
B. Greens, yellows, and blues: Greens and blues are calming and associated with nature and tranquility, which are suitable for a meditation space. However, yellows can be stimulating, especially in brighter shades, and may disrupt the serene atmosphere needed for meditation.
C. Blues, greens, and purples: Blues are widely recognized for their calming effects, as they lower heart rate and promote relaxation. Greens evoke nature and balance, also contributing to a peaceful environment. Purples, especially softer shades like lavender, are associated with spirituality and calmness, making this palette the most suitable for a meditation space. This combination creates a cohesive, soothing environment ideal forrelaxation and mindfulness.
D. Oranges, purples, and greens: Oranges are energizing and stimulating, which can be distracting in a meditation space. While purples and greens are calming, the inclusion of orange disrupts the overall tranquility of the palette.
The NCIDQ IDFX Reference Manual emphasizes that colors like blues, greens, and purples are best for creating calming environments, as they align with the psychological needs of spaces intended for relaxation and meditation.
Verified Answer from Official Source:The correct answer is C, as verified by the NCIDQ IDFX Reference Manual.
Exact Extract:
From the NCIDQ IDFX Reference Manual (Chapter 7: Design Elements and Principles): "For spaces intended for relaxation, such as meditation rooms, designers should select calming colors like blues, greens, and purples, which promote tranquility and reduce stress."
Explanation from Official Source:
The NCIDQ IDFX Reference Manual explains that blues, greens, and purples have calming psychological effects, making them ideal for spaces like meditation rooms where the goal is to create a serene and peaceful atmosphere. These colors align with the functional and emotional needs of the space.
Objectives:
Apply color psychology to select appropriate palettes for specific space functions.
Understand the emotional and psychological effects of color in interior design.
A client has purchased two art pieces to mount in their main conference room. What would be the most appropriate type of lighting to specify?
Recessed
Wall sconce
Wall washer
Fluorescent strip
Lighting for art pieces in a conference room should highlight the artwork effectively, ensuring even illumination without glare or damage to the pieces. The NCIDQ IDFX Reference Manual and lighting design standards (e.g., from the Illuminating Engineering Society [IES]) provide guidance on selecting lighting types for specific applications, such as illuminating artwork.
A. Recessed: Recessed lighting (e.g., can lights) is typically used for general ambient lighting in a space. While adjustable recessed lights can be directed toward artwork, they often create a focused beam that may cause uneven illumination or hot spots on the art, and they are not the most appropriate choice for highlighting art pieces.
B. Wall sconce: Wall sconces are decorative fixtures mounted on the wall, often used for ambient or accent lighting. While they can provide a soft glow, they are not ideal for illuminating art, as their light distribution is typically limited and may not evenly cover the artwork. Additionally, sconces may create glare if positioned incorrectly.
C. Wall washer: Wall washers are fixtures designed to provide even, diffused light across a vertical surface, such as a wall. They are ideal for illuminating art pieces because they create a uniform wash of light that highlights the artwork without hot spots or glare. Wall washerscan be mounted above the art (e.g., on the ceiling or a track) to evenly illuminate the pieces, making them the most appropriate choice for this application in a conference room.
D. Fluorescent strip: Fluorescent strip lighting is typically used for general or task lighting (e.g., under cabinets or in utility spaces). It is not suitable for illuminating art, as it can produce harsh, uneven light and may emit UV radiation that can damage artwork over time. Additionally, fluorescent lighting often has poor color rendering, which can distort the appearance of the art.
The NCIDQ IDFX Reference Manual recommends wall washers for illuminating artwork, as they provide even, glare-free light that enhances the visual impact of the pieces while protecting them from damage. This aligns with IES guidelines for museum and gallery lighting, which are applicable to conference room settings where art is displayed.
Verified Answer from Official Source:The correct answer is C, as verified by the NCIDQ IDFX Reference Manual.
Exact Extract:
From the NCIDQ IDFX Reference Manual (Chapter 8: Environmental Control Systems): "Wall washers are the most appropriate type of lighting for illuminating art pieces, as they provide even, diffused light across the artwork, minimizing glare and enhancing visibility."
Explanation from Official Source:
The NCIDQ IDFX Reference Manual explains that wall washers are designed to evenly illuminate vertical surfaces, making them ideal for highlighting art pieces. They ensure uniform light distribution, reduce glare, and protect the artwork from damage, making them the best choice for a conference room setting compared to recessed, sconce, or fluorescent strip lighting.
Objectives:
Understand the application of different lighting types in interior design.
Select appropriate lighting to highlight artwork in a conference room.
What is the minimum gypsum board finish level when applying a heavily textured wallcovering?
Level 2
Level 3
Level 4
Level 5
Gypsum board (drywall) finish levels are defined by the Gypsum Association (GA) in GA-214, "Recommended Levels of Finish for Gypsum Board," which is referenced in the NCIDQ IDFX Reference Manual. These levels range from 0 to 5, with each level specifying the degree of surface preparation required for different types of finishes, such as paint or wallcoverings. The question asks for the minimum finish level for a heavily textured wallcovering, which requires a smooth surface to ensure proper adhesion and appearance.
Level 0: No finishing; used for temporary construction. Not suitable for any wallcovering.
Level 1: Basic taping of joints and fastener heads; used in concealed areas (e.g., plenums). Not suitable for wallcoverings.
Level 2: Taping and one coat of joint compound over joints and fastener heads, with a skim coat over the surface. This level is typically used for water-resistant gypsum board in wet areas or as a substrate for tile. It is not smooth enough for wallcoverings, especially heavily textured ones, as the texture may not adhere properly.
Level 3: Taping, one coat of joint compound, and a second coat over joints and fastener heads, with a skim coat over the entire surface. This level provides a smoother surface than Level 2, making it suitable for heavily textured wallcoverings. The smoother surface ensures better adhesion and prevents the wallcovering from showing underlying imperfections,which is critical for textured finishes that may highlight surface irregularities.
Level 4: Taping, two coats of joint compound, and a skim coat over the entire surface, providing a very smooth finish. This level is typically used for flat or low-sheen paints or light wallcoverings. While it can be used for heavily textured wallcoverings, it exceeds the minimum requirement.
Level 5: The highest level, with taping, two coats of joint compound, and a full skim coat over the entire surface, plus additional smoothing. This level is used for high-gloss finishes or critical lighting conditions where imperfections must be eliminated. It is more than necessary for a heavily textured wallcovering.
For a heavily textured wallcovering, a Level 3 finish is the minimum required to ensure a smooth enough surface for proper adhesion and appearance, as the texture can mask minor imperfections. The NCIDQ IDFX Reference Manual aligns with GA-214, recommending Level 3 for textured wallcoverings.
Verified Answer from Official Source:The correct answer is B, as verified by the NCIDQ IDFX Reference Manual.
Exact Extract:
From the NCIDQ IDFX Reference Manual (Chapter 7: Design Elements and Principles): "A minimum Level 3 gypsum board finish is required for heavily textured wallcoverings to ensure a smooth surface for proper adhesion and appearance."
Explanation from Official Source:
The NCIDQ IDFX Reference Manual explains that a Level 3 finish provides a smooth surface with taping, two coats of joint compound, and a skim coat, which is sufficient for heavily textured wallcoverings. This level ensures the wallcovering adheres properly and does not show underlying imperfections, while higher levels (4 and 5) are unnecessary unless specified for other finishes like high-gloss paint.
Objectives:
Understand the gypsum board finish levels and their applications.
Select the appropriate finish level for textured wallcoverings.
A client has asked the designer to design a brochure rack for the waiting room of a clinic. The rack must be accessible to all adult patients. What should be the MAXIMUM height of the brochure rack?
48" [1219 mm] above finished floor
54" [1372 mm] above finished floor
60" [1524 mm] above finished floor
66" [1676 mm] above finished floor
For a brochure rack to be accessible to all adult patients, including those with disabilities, it must comply with ADA accessibility guidelines. The ADA specifies that the maximum reach height for operable parts (like a brochure rack) is 54 inches (1372 mm) above the finished floor for a side reach, assuming a clear floor space for a wheelchair user. This height ensures that individuals, including those in wheelchairs, can access the brochures without undue difficulty. Option A (48") is within the forward reach limit but is unnecessarily restrictive for a side reach. Options C (60") and D (66") exceed the ADA maximum reach height, making the rack inaccessible to some users.
Verified Answer from Official Source:
The correct answer is verified using NCIDQ IDFX content on accessibility standards.
Exact Extract:TheNCIDQ IDFX Reference Manualreferences ADA standards, stating, “The maximum height for operable parts, such as a brochure rack, is 54 inches (1372 mm) above the finished floor for a side reach to ensure accessibility.”
The NCIDQ IDFX curriculum requires designers to apply ADA standards to ensureaccessibility, with specific reach ranges for operable elements like brochure racks.
Objectives:
Apply accessibility standards to design elements (IDFX Objective: Codes and Standards).
The code requires a design to have a two-hour rated wall and an appropriately rated door. What are the ESSENTIAL components of this rated system?
Metal studs, metal door, and closing device
Metal studs, one layer 5/8" [16 mm] drywall on each side, batt insulation, 60-minute rated door, and closing device
Metal studs, two layers 5/8" [16 mm] drywall (type X) on each side, 90-minute rated door, and closing device
Metal studs, two layers 5/8" [16 mm] drywall (type X) on one side, 120-minute rated door, and closing device
A two-hour rated wall assembly is required to resist fire for two hours, as per the International Building Code (IBC). This typically involves metal studs with two layers of 5/8" Type X drywall on each side, as Type X drywall is specifically designed for fire resistance. For a two-hour rated wall, the door must also be appropriately rated. The IBC specifies that doors in a two-hour rated wall should have a minimum fire rating of 90 minutes (1.5 hours), as doors are typically rated at 3/4 of the wall’s rating. A closing device (self-closing mechanism) is also required to ensure the door closes automatically during a fire. Option A lacks drywall specifications. Option B has only one layer of drywall per side and a 60-minute door, which is insufficient. Option D has two layers on only one side and a 120-minute door, which exceeds the requirement unnecessarily and is unbalanced.
Verified Answer from Official Source:
The correct answer is verified using NCIDQ IDFX content on fire-rated assemblies and IBC standards.
Exact Extract:TheNCIDQ IDFX Reference Manualreferences IBC standards, stating, “A two-hour fire-rated wall typically requires two layers of 5/8" Type X drywall on each side, and the door in such a wall must be rated for at least 90 minutes with a closing device.”
The NCIDQ IDFX curriculum requires knowledge of fire-rated assemblies, including wall and door ratings, to ensure life safety in design.
Objectives:
Understand fire-rated construction requirements (IDFX Objective: Codes and Standards).
The client has expressed a desire for a new space that supports a highly collaborative environment. Which aspect of the design is MOST important?
Ergonomic seating
Furniture placement
Integrated daylighting
Acoustical wall finishes
A highly collaborative environment requires a design that facilitates interaction, communication, and teamwork among occupants. Furniture placement is the most important aspect because it directly impacts how people interact—arranging furniture to create open, flexible spaces encourages collaboration by allowing for group discussions, easy movement, and shared work areas. For example, placing tables in a circular or U-shaped arrangement fosters face-to-face interaction. Option A (ergonomic seating) is important for comfort but does not directly address collaboration. Option C (integrated daylighting) enhances the overall environment but is secondary to spatial arrangement for collaboration. Option D (acoustical wall finishes) helps with sound control, which is important but not the primary factor for fostering collaboration.
Verified Answer from Official Source:
The correct answer is verified using NCIDQ IDFX content on human behavior and space planning.
Exact Extract:TheNCIDQ IDFX Reference Manualstates, “In collaborative environments, furniture placement is the most critical design aspect to facilitate interaction and teamwork, such as arranging seating to encourage face-to-face communication.”
The NCIDQ IDFX curriculum emphasizes the role of spatial arrangement in supporting specific user activities, with furniture placement being key to creating collaborative spaces.
Objectives:
Design spaces to support user activities and interactions (IDFX Objective: Human Behavior and the Designed Environment).
A completed programming package MUST contain which feature?
Selection of colors and finishes
A list of project needs and concerns
A budget with detailed cost estimates
Preliminary drawings and design concepts
The programming phase in interior design involves gathering and analyzing information to define the project’s requirements. A completed programming package must include a list of project needs and concerns, such as spatial requirements, functional needs, and client goals, as this forms the foundation for the design process. Option A (selection of colors and finishes) occurs later, during the design development phase. Option C (budget with detailed cost estimates) may be part of programming but is not a required component of the package. Option D (preliminary drawings and design concepts) is part of the schematic design phase, not programming.
Verified Answer from Official Source:
The correct answer is verified using NCIDQ IDFX content on the programming phase.
Exact Extract:TheNCIDQ IDFX Reference Manualstates, “The programming package must include a comprehensive list of project needs and concerns, including spatial, functional, and client-specific requirements.”
The NCIDQ IDFX curriculum defines programming as the process of identifying the client’s needs and project requirements, which are documented in a programming package to guide the design process.
Objectives:
Understand the components of the programming phase (IDFX Objective: Programming andSite Analysis).
What is the total length of ramp required for a rise of 1'-6" [45.72 cm]?
12 feet [3.66 m]
16 feet [4.88 m]
18 feet [5.49 m]
36 feet [10.97 m]
The total length of a ramp is determined by its slope, which must comply with ADA accessibility standards. The ADA requires a maximum slope of 1:12 for ramps, meaning for every 1 inch of rise, the ramp must extend 12 inches in length. A rise of 1'-6" is 18 inches (since 1 foot = 12 inches, 1'-6" = 12 + 6 = 18 inches). Using the 1:12 ratio, the ramp length is 18 inches x 12 = 216 inches, or 216 ÷ 12 = 18 feet. Therefore, the total length required is 18 feet (5.49 m). Option A (12 feet) would result in a steeper slope (1:8), which is not ADA-compliant. Option B (16 feet) is also too short (slope of 1:10.67). Option D (36 feet) is excessive and not the minimum required.
Verified Answer from Official Source:
The correct answer is verified using NCIDQ IDFX content on accessibility standards.
Exact Extract:TheNCIDQ IDFX Reference Manualreferences ADA standards, stating, “For a ramp with a rise of 18 inches, the minimum length required at a 1:12 slope is 18 feet (216 inches), ensuring accessibility.”
The NCIDQ IDFX curriculum requires designers to apply ADA standards for ramps, with the 1:12 slope being the maximum allowable to ensure safe access for wheelchair users.
Objectives:
Apply accessibility standards to ramp design (IDFX Objective: Codes and Standards).
When would a designer use a bubble diagram in lieu of a stacking plan?
The project will be on multiple floors
Show the program fits into a desired space
Show actual space allocations and blocking
Need to understand project requirements in a plan view
Bubble diagrams and stacking plans are both early-stage design tools used in the programming and schematic design phases, but they serve different purposes. The NCIDQ IDFX Reference Manual outlines their applications and when each is most appropriate.
Bubble diagram: A bubble diagram is a conceptual tool used to explore functional relationships and adjacencies between spaces. It is typically a two-dimensional plan view, with bubbles representing spaces and lines indicating relationships or circulation. It is not drawn to scale and focuses on understanding the project’s requirements and spatial organization at a high level.
Stacking plan: A stacking plan is used for multi-floor buildings to show how spaces are distributed vertically across floors. It is a diagrammatic representation (often a section or elevation view) that indicates which functions or departments are assigned to each floor, ensuring efficient use of vertical space.
Now, let’s evaluate the options:
A. The project will be on multiple floors: A stacking plan is specifically used for multi-floor projects to determine how spaces are distributed across floors. A bubble diagram would not be used in lieu of a stacking plan in this case, as it does not address vertical organization.
B. Show the program fits into a desired space: This task involves fitting the program into a specific space, often requiring a block plan or preliminary space plan, which are more developed than a bubble diagram. A bubble diagram is too conceptual for this purpose, and a stacking plan would be irrelevant unless the project involves multiple floors.
C. Show actual space allocations and blocking: Actual space allocations and blocking are shown in a block plan or space plan, which are drawn to scale and fit spaces into the building envelope. A bubble diagram is not used for this, as it is not to scale and does not show actual allocations.
D. Need to understand project requirements in a plan view: A bubble diagram is used to understand project requirements by exploring spatial relationships and adjacencies in a plan view. It is a two-dimensional tool that helps the designer conceptualize how spaces should be organized based on functional needs. A stacking plan, which focuses on vertical distribution across floors, would not be appropriate for this purpose, making a bubble diagram the preferred tool in this scenario.
The NCIDQ IDFX Reference Manual confirms that a bubble diagram is used in lieu of a stacking plan when the focus is on understanding project requirements in a plan view, rather than vertical organization across multiple floors.
Verified Answer from Official Source:The correct answer is D, as verified by the NCIDQ IDFX Reference Manual.
Exact Extract:
From the NCIDQ IDFX Reference Manual (Chapter 3: Programming and Space Planning): "A bubble diagram is used in lieu of a stacking plan when the designer needs to understand project requirements in a plan view, focusing on functional relationships and adjacencies in a two-dimensional format."
Explanation from Official Source:
The NCIDQ IDFX Reference Manual explains that a bubble diagram is a two-dimensional tool used to explore project requirements and spatial relationships in a plan view, making it suitable for understanding adjacencies and functions at a conceptual level. A stacking plan, which addresses vertical distribution in multi-floor projects, is not appropriate for this purpose, so a bubble diagram is used instead.
Objectives:
Understand the differences between bubble diagrams and stacking plans in the design process.
Identify when to use a bubble diagram to explore project requirements.
Which certification should the designer look for in the wood specifications if concerned about sustainable sourcing?
EPA
FSC
LEED
USGBC (CAGBC)
Sustainable sourcing of wood ensures that it comes from responsibly managed forests, reducing environmental impact. The Forest Stewardship Council (FSC) certification is the most recognized standard for sustainable wood sourcing, verifying that the wood is harvested in an environmentally and socially responsible manner. Option A (EPA) is a regulatory agency, not a certification for wood. Option C (LEED) is a green building certification system that may credit FSC-certified wood but is not a wood certification itself. Option D (USGBC/CAGBC) is the organization behind LEED, not a certification for wood.
Verified Answer from Official Source:
The correct answer is verified using NCIDQ IDFX content on sustainable design.
Exact Extract:TheNCIDQ IDFX Reference Manualstates, “When concerned about sustainable sourcing of wood, designers should look for FSC certification, which ensures responsible forest management.”
The NCIDQ IDFX curriculum includes sustainable design principles, with FSC certification being the standard for verifying sustainable wood sourcing.
Objectives:
Specify sustainable materials in design (IDFX Objective: Material Selection andSpecification).
What does line "A" on the floor plan represent?
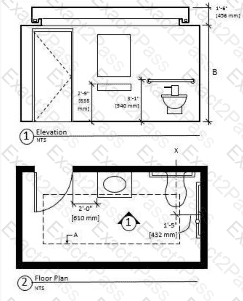
Hidden object
Light cove edge
Pattern on the floor
Item to be removed
Which project phase includes relationship diagrams, block plans, preliminary space plans, and study models?
Pre-design
Programming
Schematic design
Design development
The interior design process consists of several phases, each with specific deliverables and activities. The NCIDQ IDFX Reference Manual outlines these phases, including pre-design, programming, schematic design, and design development, and describes the tasks associated with each.
A. Pre-design: Pre-design involves initial project setup activities, such as defining the project scope, budget, and timeline, and conducting feasibility studies. It does not typically include design deliverables like diagrams or plans.
B. Programming: Programming is the phase where the designer gathers and analyzes the client’s needs and requirements. While it may include conceptual tools like bubble diagrams to explore relationships, it does not typically involve block plans, preliminary space plans, or study models, which are more developed design deliverables.
C. Schematic design: Schematic design is the phase where the designer begins to translate the programming data into conceptual design solutions. This includes creating relationship diagrams (e.g., refined bubble diagrams), block plans (to fit spaces into the building envelope), preliminary space plans (initial layouts), and study models (to explore spatial relationships in three dimensions). These deliverables are characteristic of schematic design, as they help the designer and client visualize the design concept before moving into detailed development.
D. Design development: Design development involves refining the schematic design, creating detailed drawings, and selecting materials and finishes. While it builds on the work from schematic design, it focuses on detailed documentation rather than conceptual tools like relationship diagrams or study models.
The NCIDQ IDFX Reference Manual specifies that relationship diagrams, block plans, preliminary space plans, and study models are part of the schematic design phase, as they are used to develop and communicate the initial design concept.
Verified Answer from Official Source:The correct answer is C, as verified by the NCIDQ IDFX Reference Manual.
Exact Extract:
From the NCIDQ IDFX Reference Manual (Chapter 3: Programming and Space Planning): "Schematic design includes the creation of relationship diagrams, block plans, preliminary space plans, and study models to develop and communicate the initial design concept."
Explanation from Official Source:
The NCIDQ IDFX Reference Manual explains that schematic design is the phase where conceptual design tools like relationship diagrams, block plans, preliminary space plans, and study models are used to explore and refine the design concept. This phase bridges the gap between programming (data collection) and design development (detailed documentation), making it the appropriate phase for these deliverables.
Objectives:
Understand the phases of the interior design process and their deliverables.
Identify the role of schematic design in developing conceptual design solutions.
What is the minimum fire rating requirement for a door assembly in a two-hour wall that divides occupancies?
1/3 hour
3/4 hour
1 1/2 hour
3 hour
A two-hour wall that divides occupancies is typically a fire barrier, as defined by the International Building Code (IBC). Fire barriers are used to separate different occupancy types (e.g., a business occupancy from an assembly occupancy) to prevent the spread of fire between them. The NCIDQ IDFX Reference Manual and IBC Section 707 (Fire Barriers) specify the fire resistance requirements for such walls and their openings, including doors.
According to IBC Section 716 (Opening Protectives), the fire protection rating of a door assembly in a fire barrier is based on the fire resistance rating of the wall. For a two-hour fire barrier:
IBC Table 716.1(2) states that doors in a fire barrier with a fire resistance rating of 2 hours must have a minimum fire protection rating of 1 1/2 hours (90 minutes). This ensures that the door can withstand fire exposure for a significant portion of the wall’s rating, providing adequate protection while allowing for practical door construction (e.g., a 90-minute-rated door is a common standard).
The door must also be self-closing or automatic-closing to maintain the integrity of the fire barrier, but this is not part of the question.
Let’s evaluate the options:
A. 1/3 hour (20 minutes): A 20-minute rating is typically used for doors in smoke partitions or in 1-hour fire partitions (e.g., corridor walls in sprinklered buildings, per IBC Table 716.1(2)). It is far too low for a 2-hour fire barrier.
B. 3/4 hour (45 minutes): A 45-minute rating is used for doors in 1-hour fire barriers or partitions (e.g., tenant separations in sprinklered buildings). It is insufficient for a 2-hour fire barrier.
C. 1 1/2 hour (90 minutes): This is the correct rating for a door in a 2-hour fire barrier, asspecified by IBC Table 716.1(2). It ensures the door provides adequate fire protection while maintaining the integrity of the fire barrier.
D. 3 hour (180 minutes): A 3-hour rating is required for doors in fire walls with a 4-hour fire resistance rating (per IBC Table 716.1(2)). It is excessive for a 2-hour fire barrier and not a common standard for most door assemblies.
The NCIDQ IDFX Reference Manual aligns with IBC requirements, confirming that a door in a 2-hour fire barrier must have a 1 1/2-hour fire protection rating to ensure safety.
Verified Answer from Official Source:The correct answer is C, as verified by the NCIDQ IDFX Reference Manual and IBC Section 716.
Exact Extract:
From the NCIDQ IDFX Reference Manual (Chapter 2: Building Codes and Standards): "A door assembly in a 2-hour fire barrier, such as one dividing occupancies, must have a minimum fire protection rating of 1 1/2 hours (90 minutes) to maintain the integrity of the fire separation."
Explanation from Official Source:
The NCIDQ IDFX Reference Manual explains that doors in fire barriers must have a fire protection rating that corresponds to the wall’s fire resistance rating, as specified in the IBC. For a 2-hour fire barrier, a 1 1/2-hour rating for the door ensures that the opening does not compromise the wall’s ability to prevent fire spread, providing sufficient time for evacuation and fire suppression.
Objectives:
Understand the fire protection requirements for doors in fire barriers.
Apply building code standards to ensure fire safety in occupancy separations.
The relative efficacy of lamps is measured in which of the following?
Luminous flux (lm)
Lumens per watt (lpW)
Foot-candles (fc) [lux (lx)]
Light reflectance value (LRV)
The relative efficacy of lamps refers to their efficiency in converting electrical energy into visible light, which is measured in lumens per watt (lpW). Lumens measure the total light output, and watts measure the power consumed, so lpW indicates how much light is produced per unit of energy, a key metric for comparing lamp efficiency. Option A (luminous flux, lm) measures total light output but does not account for energy use, so it’s not a measure of efficacy. Option C (foot-candles or lux) measures illuminance (light intensity on a surface), not lamp efficiency. Option D (light reflectance value, LRV) measures how much light a surface reflects, unrelated to lamp efficacy.
Verified Answer from Official Source:
The correct answer is verified using NCIDQ IDFX content on lighting design and technology.
Exact Extract:TheNCIDQ IDFX Reference Manualstates, “The relative efficacy of lamps is measured in lumens per watt (lpW), indicating the efficiency of light output per unit of energy consumed.”
The NCIDQ IDFX curriculum includes lighting principles, emphasizing lumens per watt as the standard measure for lamp efficacy, which is critical for sustainable design and energy efficiency.
Objectives:
Understand lighting metrics and their applications (IDFX Objective: Building Systems and Technology).
Which thick-set method would produce the BEST bond for installing tile on an uneven subfloor?
Additional grout
An extra thick layer of adhesive
A mesh substrate with membrane backing
Wire mesh reinforcement of the mortar bed
Installing tile on an uneven subfloor requires a method that ensures a strong bond and a level surface. The thick-set method involves using a mortar bed to create a stable base for the tile. Wire mesh reinforcement of the mortar bed (Option D) is the best method because the wire mesh strengthens the mortar, helping it adhere to the uneven subfloor and providing a durable, levelsurface for the tile. This method is commonly used in commercial and high-traffic areas for its reliability. Option A (additional grout) is incorrect, as grout fills joints between tiles, not the subfloor bond. Option B (extra thick layer of adhesive) can lead to uneven drying and cracking. Option C (mesh substrate with membrane backing) is more for waterproofing or crack isolation, not for leveling an uneven subfloor.
Verified Answer from Official Source:
The correct answer is verified using NCIDQ IDFX content on material installation methods.
Exact Extract:TheNCIDQ IDFX Reference Manualstates, “For uneven subfloors, the thick-set method with wire mesh reinforcement of the mortar bed provides the best bond and stability for tile installation.”
The NCIDQ IDFX curriculum covers installation methods for flooring, emphasizing the thick-set method with wire mesh for uneven surfaces to ensure a strong, lasting bond.
Objectives:
Specify appropriate installation methods for flooring (IDFX Objective: Material Selection and Specification).
What is the minimum clear width for two wheelchairs to pass according to ADA accessibility guidelines?
36" [914 mm]
48" [1219 mm]
60" [1524 mm]
72" [1829 mm]
ADA accessibility guidelines specify the minimum clear width required for two wheelchairs to pass each other, ensuring safe and accessible circulation in public spaces. The standard width for a single wheelchair is 32 inches (813 mm), but for two wheelchairs to pass, the ADA requires a minimum clear width of 60 inches (1524 mm). This accounts for the width of two wheelchairs (approximately 30 inches each) plus additional space for maneuvering. Option A (36 inches) is the minimum for a single wheelchair to pass through a doorway. Option B (48 inches) is the minimum for a wheelchair to make a 180-degree turn, not for passing. Option D (72 inches) exceeds the minimum requirement.
Verified Answer from Official Source:
The correct answer is verified using NCIDQ IDFX content on accessibility standards.
Exact Extract:TheNCIDQ IDFX Reference Manualreferences ADA standards, stating, “The minimum clear width for two wheelchairs to pass is 60 inches (1524 mm), ensuring accessible circulation in public spaces.”
The NCIDQ IDFX curriculum requires designers to apply ADA standards for circulation, with 60 inches being the minimum for two wheelchairs to pass safely.
Objectives:
Apply accessibility standards to circulation spaces (IDFX Objective: Codes and Standards).
In the northern hemisphere, which window orientation would maximize passive solar energy without the use of fans, pumps, or complex controllers?
East
West
North
South
Passive solar energy relies on the design of a building to capture, store, and distribute solar heat without mechanical systems. In the northern hemisphere, the sun rises in the east, sets in the west, and is at its highest and most direct angle in the south during the day, especially in winter when heating is most needed. South-facing windows maximize passive solar energy because they receive the most direct sunlight throughout the day, allowing for optimal heat gain. East-facing windows (Option A) get morning sun but miss afternoon heat. West-facing windows (Option B) get afternoon sun but can overheat in summer. North-facing windows (Option C) receive the least direct sunlight and are not effective for passive solar gain.
Verified Answer from Official Source:
The correct answer is verified using NCIDQ IDFX content on sustainable design and passive solar strategies.
Exact Extract:TheNCIDQ IDFX Reference Manualstates, “In the northern hemisphere, south-facing windows maximize passive solar energy by capturing the most direct sunlight for heating without mechanical systems.”
The NCIDQ IDFX curriculum includes passive solar design as a sustainable strategy, highlighting south-facing orientations for optimal solar gain in the northern hemisphere.
Objectives:
Apply passive solar design principles (IDFX Objective: Human Behavior and the Designed Environment).
If budget is the primary criterion, which method of veneer matching within individual panel faces is best?
Balance match
Running match
Blueprint matched
Balance and center match
Veneer matching refers to the method used to arrange wood veneer leaves on a panel to achieve a desired aesthetic effect. The NCIDQ IDFX Reference Manual and standards from the Architectural Woodwork Institute (AWI) and the Woodwork Institute (WI) outline different veneer matching techniques, each with varying levels of cost and complexity. When budget is the primary criterion, the method that minimizes waste and labor is preferred.
A. Balance match: In a balance match, veneer leaves are matched so that each leaf is of equal width within the panel, creating a symmetrical appearance. This requires careful selection and trimming of veneer leaves to ensure uniformity, which increases labor andmaterial costs due to waste from trimming.
B. Running match: In a running match, veneer leaves are applied sequentially as they come off the flitch (the stack of veneer sheets), without trimming for symmetry. This method allows for slight variations in leaf width and does not require the leaves to be centered or balanced, minimizing waste and labor. It is the least expensive veneer matching method because it uses the veneer as it is cut, making it the best choice when budget is the primary concern.
C. Blueprint matched: Blueprint matching (also called custom matching) involves precisely matching veneer leaves to a specific design or pattern, often across multiple panels or surfaces (e.g., for a seamless look in a high-end conference room). This method is highly labor-intensive and requires custom cutting and sequencing, making it the most expensive option.
D. Balance and center match: This method combines balance matching (equal-width leaves) with center matching (leaves are mirrored around the panel’s centerline). It requires even more precision than a balance match, as the leaves must be both uniform and centered, increasing labor and material costs due to additional trimming and waste.
The NCIDQ IDFX Reference Manual and AWI standards confirm that a running match is the most cost-effective veneer matching method, as it minimizes waste and labor, making it ideal when budget is the primary criterion.
Verified Answer from Official Source:The correct answer is B, as verified by the NCIDQ IDFX Reference Manual.
Exact Extract:
From the NCIDQ IDFX Reference Manual (Chapter 7: Design Elements and Principles): "A running match is the most cost-effective veneer matching method, as it uses veneer leaves sequentially without trimming for symmetry, minimizing waste and labor costs."
Explanation from Official Source:
The NCIDQ IDFX Reference Manual explains that a running match is the least expensive veneer matching technique because it applies veneer leaves as they come off the flitch, without the need for trimming or precise balancing. This reduces material waste and labor, making it the best choice when budget is the primary concern, compared to more labor-intensive methods like balance match, blueprint matched, or balance and center match.
Objectives:
Understand different veneer matching techniques in interior design.
Select the most cost-effective veneer matching method based on budget constraints.
Filing systems are specified by the designer and purchased by the client. Later, the manufacturer offers the designer a commission for using that product. What should they do?
Accept the commission
Politely refuse the commission
Pass the commission on to the client
Request a non-monetary commission instead
Accepting a commission from a manufacturer for specifying their product creates a conflict of interest, as it may influence the designer’s objectivity and compromise their fiduciary duty to the client. The NCIDQ Code of Ethics requires designers to act in the best interest of the client and avoid any actions that could be perceived as a conflict of interest. The designer should politely refuse the commission to maintain professional integrity. Option A (accept the commission) violates ethical standards. Option C (pass the commission to the client) still involves accepting the commission, which is unethical. Option D (request a non-monetary commission) also creates a conflict of interest, as it still involves receiving a benefit.
Verified Answer from Official Source:
The correct answer is verified using NCIDQ IDFX content on professional ethics.
Exact Extract:TheNCIDQ Code of Ethicsstates, “Designers shall not accept commissions or benefits from suppliers that may influence their professional judgment, and should refuse such offers to avoid conflicts of interest.”
The NCIDQ IDFX curriculum includes professional practice and ethics, emphasizing the importance of maintaining impartiality and transparency in product specification.
Objectives:
Understand ethical responsibilities in professional practice (IDFX Objective: Professional Practice).
Which method of collecting client data allows a designer to gather an objective record of events?
Survey
Interview
Observation
Focus group
During the programming phase of the design process, designers use various methods to collect data about the client’s needs, goals, and behaviors. The NCIDQ IDFX Reference Manual outlines these methods, emphasizing their strengths and applications in gathering accurate information. The question asks for a method that provides an "objective record of events," meaning the data is based on factual observations rather than subjective opinions or interpretations.
A. Survey: Surveys involve distributing questionnaires to gather information from a large group. While surveys can provide valuable data, the responses are subjective, as they rely on the participants’ perceptions, memories, or opinions, not an objective record of events.
B. Interview: Interviews involve direct conversations with clients or users to understand their needs and experiences. Like surveys, interviews yield subjective data, as the information is filtered through the interviewee’s perspective and may be influenced by memory or bias.
C. Observation: Observation involves the designer directly watching and recording how users interact with a space or perform tasks (e.g., observing workflows in an office). This method provides an objective record of events because the designer documents whatactually happens, rather than relying on users’ self-reported experiences. Observation minimizes bias and subjectivity, making it the best method for gathering factual data about behaviors and events.
D. Focus group: A focus group involves a moderated discussion with a small group of users to gather opinions and insights. Like surveys and interviews, the data is subjective, as it reflects the participants’ perceptions and opinions rather than an objective record of events.
The NCIDQ IDFX Reference Manual highlights observation as a method that allows designers to collect objective data by directly witnessing and documenting events, making it the most suitable choice for this question.
Verified Answer from Official Source:The correct answer is C, as verified by the NCIDQ IDFX Reference Manual.
Exact Extract:
From the NCIDQ IDFX Reference Manual (Chapter 3: Programming and Space Planning): "Observation allows a designer to gather an objective record of events by directly watching and documenting user behaviors and interactions in a space."
Explanation from Official Source:
The NCIDQ IDFX Reference Manual explains that observation is a data collection method that provides an objective record because it involves the designer directly witnessing and recording events as they occur, without relying on users’ subjective interpretations. This distinguishes observation from methods like surveys, interviews, and focus groups, which are more prone to bias.
Objectives:
Understand different methods of data collection in the programming phase.
Identify the method that provides an objective record of events.
How are the results of a Wyzenbeek test indicated on a textile label?
As resiliency
As double rubs
As stain resistance
As coefficient of friction
The Wyzenbeek test is a standard method used to measure the abrasion resistance of textiles, particularly for upholstery fabrics. The test involves rubbing a fabric sample with a standard abrasive material and counting the number of “double rubs” (one back-and-forth motion) the fabric can withstand before showing wear. The result is indicated on a textile label as “double rubs,” providing a numerical value (e.g., 30,000 double rubs) to indicate durability. Option A (resiliency) refers to a material’s ability to recover its shape, not abrasion resistance. Option C (stain resistance) is unrelated to the Wyzenbeek test. Option D (coefficient of friction) measures surface slipperiness, not durability.
Verified Answer from Official Source:
The correct answer is verified using NCIDQ IDFX content on material testing and specifications.
Exact Extract:TheNCIDQ IDFX Reference Manualstates, “The Wyzenbeek test measures abrasion resistance of textiles, and the results are indicated on the label as the number of double rubs the fabric can withstand.”
The NCIDQ IDFX curriculum includes understanding textile testing methods like the Wyzenbeek test to ensure appropriate material selection for durability in commercial and residential applications.
Objectives:
Understand material testing methods and their applications (IDFX Objective: Material Selection and Specification).
Which of the following should be specified to ensure a sufficient level of light is present in a daylit office space?
Timer
Photosensor
Vacancy sensor
Occupancy sensor
Daylighting in an office space involves using natural light to illuminate the interior, reducing the need for artificial lighting and improving energy efficiency. However, natural light levels vary throughout the day due to factors like weather, time, and window orientation. To ensure a sufficient level of light in a daylit office, a control system is needed to adjust artificial lighting based on the available natural light. The NCIDQ IDFX Reference Manual and lighting design standards (e.g., from the Illuminating Engineering Society [IES] and ASHRAE 90.1) provide guidance on daylighting controls.
A. Timer: A timer turns lights on or off at preset times. While it can help with energy savings, it does not respond to the actual light levels in the space, so it cannot ensure a sufficient level of light in a daylit office where natural light fluctuates.
B. Photosensor: A photosensor (also called a photocell) measures the ambient light level in a space and adjusts artificial lighting accordingly. In a daylit office, a photosensor can dim or turn off artificial lights when natural light is sufficient, and increase artificial lighting when natural light decreases (e.g., on a cloudy day). This ensures a consistent and sufficient light level, making it the best choice for a daylit space.
C. Vacancy sensor: A vacancy sensor turns lights off when a space is unoccupied, requiring manual activation to turn lights on. It is designed for energy savings but does not adjust lighting based on light levels, so it cannot ensure sufficient illumination in a daylit office.
D. Occupancy sensor: An occupancy sensor turns lights on when it detects motion and off when the space is unoccupied. Like a vacancy sensor, it focuses on occupancy rather than light levels, so it does not address the need to maintain sufficient light in a daylit space.
The NCIDQ IDFX Reference Manual specifies that photosensors are the appropriate control for daylighting systems, as they dynamically adjust artificial lighting to maintain consistentillumination levels in response to natural light. This aligns with energy efficiency standards like ASHRAE 90.1, which requires daylighting controls in certain spaces.
Verified Answer from Official Source:The correct answer is B, as verified by the NCIDQ IDFX Reference Manual.
Exact Extract:
From the NCIDQ IDFX Reference Manual (Chapter 8: Environmental Control Systems): "In a daylit space, a photosensor should be specified to ensure a sufficient level of light by adjusting artificial lighting based on the available natural light."
Explanation from Official Source:
The NCIDQ IDFX Reference Manual explains that photosensors are essential for daylighting control, as they measure ambient light levels and adjust artificial lighting to maintain a consistent illumination level. This ensures that a daylit office space always has sufficient light, regardless of variations in natural light, while also optimizing energy use.
Objectives:
Understand the role of lighting controls in daylighting design.
Select appropriate controls to maintain sufficient light levels in daylit spaces.
Which of the following is an example of unethical behavior?
Competitively bidding a flooring contract
Approving a substitution from a contractor
Receiving a kickback for specifying a specific product
Giving a recommendation for a previously used installer
Ethical behavior in interior design is governed by professional codes of conduct, such as the NCIDQ Code of Ethics and the codes established by organizations like the American Society of Interior Designers (ASID) and the International Interior Design Association (IIDA). These codes emphasize integrity, transparency, and acting in the best interest of the client.
A. Competitively bidding a flooring contract: This is a standard practice in the industry to ensure fair pricing and quality. It is not unethical as long as the bidding process is transparent and fair.
B. Approving a substitution from a contractor: Approving a substitution is a common practice during construction, provided the substitution meets the design intent, specifications, and code requirements, and is approved by the client. This is not inherently unethical.
C. Receiving a kickback for specifying a specific product: A kickback is a payment or benefit received in exchange for specifying a product, which creates a conflict of interest. This is explicitly prohibited by the NCIDQ Code of Ethics, as it undermines the designer’s duty to act in the client’s best interest and compromises professional integrity.
D. Giving a recommendation for a previously used installer: Recommending a trusted installer based on past performance is a professional practice, as long as the recommendation is based on merit and not influenced by personal gain. This is not unethical.
The NCIDQ Code of Ethics explicitly states that designers must avoid conflicts of interest, such as accepting kickbacks, to maintain professionalism and protect the client’s interests.
Verified Answer from Official Source:The correct answer is C, as verified by the NCIDQ Code of Ethics.
Exact Extract:
From the NCIDQ Code of Ethics (Section 2: Responsibility to the Client): "Interior designers shall not accept compensation, including kickbacks, from suppliers or manufacturers for specifying products, as this creates a conflict of interest and undermines the designer’s duty to act in the best interest of the client."
Explanation from Official Source:
The NCIDQ Code of Ethics emphasizes that accepting kickbacks is a clear violation of ethical standards, as it prioritizes personal gain over the client’s needs and compromises the integrity of the design process.
Objectives:
Understand ethical standards in interior design practice.
Identify behaviors that violate the NCIDQ Code of Ethics.
Dimensions are typically written
Below the center line
Above the dimension line
Center to the dimension line
Anywhere near the dimension line
Dimensioning in architectural and interior design drawings follows standard drafting conventions to ensure clarity and consistency. The NCIDQ IDFX Reference Manual and standards like the National CAD Standard (NCS) and the American Institute of Architects (AIA) guidelines specify how dimensions should be placed in drawings.
Dimension line: A dimension line is a line with arrows at each end that indicates the distance between two points. The numerical dimension (e.g., 5'-0") is placed in relation to this line.
Standard practice: In architectural drawings, dimensions are typically written above the dimension line, centered between the extension lines, to ensure readability and avoid clutter. This placement keeps the dimension clear of other lines (e.g., the dimension line itself or nearby object lines) and follows a consistent convention for construction drawings.
Let’s evaluate the options:
A. Below the center line: The term "center line" typically refers to a line indicating the center of a circular feature (e.g., a column), not a dimension line. Dimensions are not placed below a center line, and this placement would not apply to general dimensioning.
B. Above the dimension line: This is the standard practice in architectural drafting. The dimension number is placed above the dimension line, centered between the extension lines, ensuring it is easily readable and does not overlap with other elements in the drawing.
C. Center to the dimension line: This implies placing the dimension number directly on the dimension line, which is not standard practice. It can make the drawing cluttered and harder to read, as the number may overlap with the line or arrows.
D. Anywhere near the dimension line: Placing dimensions "anywhere near" the dimension line lacks consistency and clarity, which is critical in construction drawings. This is not an acceptable practice, as it can lead to misinterpretation.
The NCIDQ IDFX Reference Manual confirms that dimensions are typically written above the dimension line, aligning with industry standards for clarity and consistency in construction documentation.
Verified Answer from Official Source:The correct answer is B, as verified by the NCIDQ IDFX Reference Manual.
Exact Extract:
From the NCIDQ IDFX Reference Manual (Chapter 5: Construction Drawings and Specifications): "Dimensions are typically written above the dimension line, centered between the extension lines, to ensure clarity and readability in construction drawings."
Explanation from Official Source:
The NCIDQ IDFX Reference Manual explains that placing dimensions above the dimension line is the standard convention in architectural drafting, ensuring that the numerical value is clear, readable, and does not interfere with other elements in the drawing. This practice aligns with industry standards to maintain consistency and avoid errors during construction.
Objectives:
Understand standard dimensioning practices in construction drawings.
Identify the correct placement of dimensions for clarity and consistency.
The laws of perception, proximity, closure, continuity, and similarity are part of which theory?
Gestalt
Maslow's
Integration
Third place
The laws of perception, including proximity (elements close together are perceived as related),closure (the mind completes incomplete shapes), continuity (elements aligned in a path are seen as continuous), and similarity (similar elements are grouped together), are principles of Gestalt theory. Gestalt theory, developed by psychologists in the early 20th century, explains how humans perceive and organize visual information into meaningful patterns. Option B (Maslow’s) refers to the hierarchy of needs, a motivational theory, not perception. Option C (integration) is not a recognized theory in this context. Option D (third place) refers to social spaces outside home and work, unrelated to perception.
Verified Answer from Official Source:
The correct answer is verified using NCIDQ IDFX content on human behavior and perception.
Exact Extract:TheNCIDQ IDFX Reference Manualstates, “The laws of perception, such as proximity, closure, continuity, and similarity, are part of Gestalt theory, which explains how humans organize visual information.”
The NCIDQ IDFX curriculum includes Gestalt theory as part of understanding human perception, which informs design decisions related to visual organization and aesthetics.
Objectives:
Understand theories of perception in design (IDFX Objective: Human Behavior and the Designed Environment).
In a senior living facility, which of the following floor coverings is best to avoid falls?
Multi-level, cut and loop carpet, direct glue installation
Low pile, plush carpet, installed over pad
Low pile, high density carpet, direct glue installation
Cut pile, low density carpet, direct glue installation
In senior living facilities, floor coverings must be selected to minimize the risk of falls, which is a significant concern for older adults due to potential mobility and balance issues. The NCIDQ IDFX Reference Manual and accessibility standards, such as the ADA and the Uniform Federal Accessibility Standards (UFAS), provide guidelines for safe flooring in such environments. Key factors to consider include surface texture, pile height, density, and installation method, as these affect traction, stability, and ease of movement, especially for those using assistive devices like walkers or wheelchairs.
A. Multi-level, cut and loop carpet, direct glue installation: Multi-level carpets have varying pile heights, which can create uneven surfaces and increase the risk of tripping. While the direct glue installation provides stability, the multi-level texture makes this option less safe for seniors.
B. Low pile, plush carpet, installed over pad: Plush carpet, even with a low pile, is soft and cushioned, which can cause instability for seniors, especially those with mobility issues. The padding underneath adds to the softness, making it harder to walk on and increasing the risk of falls. Additionally, padded carpets can create resistance for wheelchairs, making mobility more difficult.
C. Low pile, high density carpet, direct glue installation: Low pile (short fibers) reduces the risk of tripping, and high density (tightly packed fibers) provides a firm, stable surfacethat supports walking and wheelchair movement. Direct glue installation ensures the carpet is securely adhered to the floor, preventing shifts or wrinkles that could cause tripping. This option offers the best combination of safety and stability for a senior living facility.
D. Cut pile, low density carpet, direct glue installation: While the low pile and direct glue installation are positive, low density means the carpet fibers are less tightly packed, resulting in a softer, less stable surface. This can increase the risk of falls compared to a high-density carpet.
The NCIDQ IDFX Reference Manual emphasizes that flooring in senior living facilities should prioritize safety by providing a firm, even surface with good traction. Low pile, high-density carpet with a direct glue installation meets these criteria, aligning with accessibility standards like the ADA, which requires flooring to be "stable, firm, and slip-resistant."
Verified Answer from Official Source:The correct answer is C, as verified by the NCIDQ IDFX Reference Manual and ADA Standards for Accessible Design.
Exact Extract:
From the NCIDQ IDFX Reference Manual (Chapter 6: Human Factors and Ergonomics): "In senior living facilities, flooring should be selected to minimize fall risks, with low pile, high-density carpet installed using direct glue methods providing a stable, firm surface that supports safe mobility."
Explanation from Official Source:
The NCIDQ IDFX Reference Manual explains that low pile, high-density carpet with direct glue installation is ideal for senior living facilities because it provides a firm, even surface that reduces tripping hazards and supports mobility for residents, including those using assistive devices. The manual also references accessibility standards, such as the ADA, which require flooring to be stable and slip-resistant to ensure safety.
Objectives:
Understand the safety considerations for flooring in senior living facilities.
Apply accessibility standards to select appropriate floor coverings for vulnerable populations.
A new reflected ceiling plan communicates location and
Soffit heights
Types of partitions
Type of electrical outlets
Demolition of existing ceiling types
A reflected ceiling plan (RCP) is a drawing that shows the ceiling of a space as if it were reflected onto the floor plan, illustrating elements such as lighting fixtures, sprinklers, ceiling materials, and other ceiling features. The NCIDQ IDFX Reference Manual outlines the purpose and content of an RCP in construction documents.
A. Soffit heights: An RCP often includes information about soffits (lowered ceiling sections), such as their location and height, to ensure proper coordination with lighting, HVAC, and other ceiling elements. Soffit heights are critical for understanding vertical clearances and ensuring that the design aligns with code requirements (e.g., minimum ceiling heights). This makes soffit heights a key piece of information communicated in an RCP.
B. Types of partitions: Partition types (e.g., wall construction) are shown on floor plans or partition plans, not on an RCP, which focuses on ceiling elements.
C. Type of electrical outlets: Electrical outlets are shown on power plans or electrical floor plans, not on an RCP, which is concerned with ceiling-mounted electrical elements like lighting fixtures.
D. Demolition of existing ceiling types: Demolition is shown on a separate demolition plan, not on a new RCP, which depicts the proposed ceiling design for construction.
The NCIDQ IDFX Reference Manual specifies that an RCP communicates the location of ceiling elements and includes details like soffit heights to ensure proper installation and coordination with other building systems.
Verified Answer from Official Source:The correct answer is A, as verified by the NCIDQ IDFX Reference Manual.
Exact Extract:
From the NCIDQ IDFX Reference Manual (Chapter 5: Construction Drawings and Specifications): "A reflected ceiling plan communicates the location of ceiling elements, such as lighting and sprinklers, and includes details like soffit heights to ensure proper coordination and installation."
Explanation from Official Source:
The NCIDQ IDFX Reference Manual explains that an RCP is used to show the design of the ceiling, including the placement of fixtures and features like soffits. Soffit heights are a critical detail because they affect the overall ceiling design, vertical clearances, and coordination with other systems, making this a standard piece of information included in an RCP.
Objectives:
Understand the purpose and content of a reflected ceiling plan.
Identify the types of information communicated in an RCP.
What is the MOST important reason to review an organization's current furniture standards?
To determine the condition of the furniture for feasibility of reuse
To determine the dimensions of the existing furniture used in the current design
To determine how much furniture will be moved during your remodeling of the space
To determine whether the current furniture is functioning adequately for the client's needs
Reviewing an organization’s current furniture standards is a critical step in the programming phase to assess whether existing furniture can be reused in the new design, which impacts budget, sustainability, and project timeline. The most important reason is to determine the condition of the furniture for feasibility of reuse, as this directly affects whether the furniture can meet the project’s functional and aesthetic goals. Option B (dimensions) is a secondary concern, as dimensions can bemeasured later if reuse is feasible. Option C (how much furniture will be moved) is logistical, not a primary reason for review. Option D (functioning adequately) is important but less critical than assessing physical condition for reuse, which is a foundational decision.
Verified Answer from Official Source:
The correct answer is verified using NCIDQ IDFX content on programming and furniture assessment.
Exact Extract:TheNCIDQ IDFX Reference Manualstates, “Reviewing current furniture standards is primarily to assess the condition of existing furniture for potential reuse in the new design.”
The NCIDQ IDFX curriculum highlights the importance of evaluating existing resources during programming to make informed decisions about reuse, aligning with sustainable design practices.
Objectives:
Assess existing conditions during programming (IDFX Objective: Programming and Site Analysis).
A client notes that they have insufficient tiling and storage in their newly completed space. This could have been avoided if the designer had
Researched precedents
Conducted programming
Completed code research
Developed a punch [deficiency] list
The issue of insufficient tiling and storage in a completed space points to a failure in understanding the client’s needs and requirements during the design process. The NCIDQ IDFX Reference Manual outlines the steps of the design process, emphasizing the importance of each phase in ensuring a successful project outcome.
A. Researched precedents: Researching precedents involves studying similar projects to inform design decisions. While this can provide inspiration, it does not directly address the client’s specific needs for tiling and storage, which are unique to their project.
B. Conducted programming: Programming is the phase of the design process where the designer gathers and analyzes the client’s needs, goals, and requirements. This includes determining the amount of storage needed, the types of spaces required, and specific material needs like tiling. If the designer had conducted thorough programming, they would have identified the client’s need for sufficient tiling (e.g., in wet areas) and storage (e.g., cabinets, shelving) early in the process, ensuring these elements were incorporated into the design. This makes programming the most relevant step to avoid the issue.
C. Completed code research: Code research ensures compliance with building codes, such as egress, accessibility, and fire safety. While important, it is not directly related to the quantity of tiling or storage, which are functional and client-specific requirements rather than code-driven.
D. Developed a punch [deficiency] list: A punch list is created at the end of a project to identify deficiencies or incomplete work (e.g., missing tiles, unfinished storage installation). While a punch list might catch installation errors, it does not address the root cause of insufficient tiling and storage, which is a failure to plan for these elements during the design phase.
The NCIDQ IDFX Reference Manual emphasizes that programming is the foundation of a successful design, as it ensures that the client’s needs are fully understood and addressed in the design solution. Insufficient tiling and storage indicate a lack of proper programming.
Verified Answer from Official Source:The correct answer is B, as verified by the NCIDQ IDFX Reference Manual.
Exact Extract:
From the NCIDQ IDFX Reference Manual (Chapter 3: Programming and Space Planning):"Programming involves gathering and analyzing the client’s needs and requirements, such as storage and material specifications, to ensure the design meets their functional and aesthetic goals."
Explanation from Official Source:
The NCIDQ IDFX Reference Manual explains that programming is the process of identifying the client’s specific needs, such as the amount of storage or the extent of tiling required for a space. By conducting thorough programming, the designer can incorporate these requirements into the design, preventing issues like insufficient tiling or storage in the completed project.
Objectives:
Understand the role of programming in the interior design process.
Identify how programming prevents design deficiencies related to client needs.